Pages

Friday 21 December 2012

Handmade Christmas#2 ... with a little help from my friends

Once upon a time there was a little princess who lived in Los Angeles, and she travelled all the way across the Atlantic in a brown paper envelope.


But when she arrived, the foolish English lady in wanted to put her in a cold hard frame on the wall. The princess was too polite to object, but she looked a little bit sad, and when the lady looked closer, she knew that the little princess really wanted to be snuggled up in a cosy quilt on a bed just like the one in her picture - though perhaps with not quite so many mattresses, and fewer under-bed vegetables.


The little princess was pleased, and she used her most serious look, and clasped her tiny painted hands together as if to say 'these are my colours - can you match them?'. 
And luckily the lady had been collecting fabric scraps since before the dawn of time, and had a whole plethora of pinks and greens and oranges, so the little princess felt a glimmer of hope that there might be a happy ending ahead.


But the sewing lady had never made a quilt in her whole life, and didn't know what was what or which way was up, and kept going on and on about log cabin blocks. The little princess had to stamp her tiny foot - making the whole mattress mountain wobble - to say 'NO NO NO. I am a princess and I do not do log cabins at all, I do castles and dragons and legumes. And can you not see, foolish sewing lady who has never made a quilt, that my mattresses are horizontal and so your stripes should clearly be horizontal too'.


The befuddled lady was way out of her depth and knew it was time to look for help. So she turned to her fairy godmother online sewing friends, who said 'this is the pattern you need, and this tutorial will solve your binding angst, and this one will help with the hand stitching - which you can do on the sofa, so be happy - and always cut your backing and wadding bigger than your front piece and always use a walking foot if you have one'.


And the little princess had her cosy quilt in a twinkling.
She didn't even mind being wrapped up in a parcel, because it reminded her a bit of her nice brown envelope, and because she knew that her happy-ever-after ending would come one day very soon.


 Happy Christmas!


Tuesday 18 December 2012

I'm dreaming of a handmade Christmas...

... but would really have had to start three seasons ago to make it a reality. 

No matter, it's fine to start small (and late). 

Last year's cards have been recycled into gift tags, along with all those snippets of ribbon which I've been saving forever for no clear purpose.


Perfect!


(There's a a more ambitious project underway as well, but let's not even speak of it until it's finished, whenever that might be).

Tuesday 13 November 2012

Kindle cosy


This is how technological innovation happens in my life:

husband acquires flashy new gadget;
gadget is superseded by newer and flashier gadget; 
original gadget becomes mine.


I didn't expect to be so smitten by the Kindle, but I've made it a nicer coat than any I own myself so there must be a message in there.

The wool boucle is from Fabric Godmother, and the silk lining is from Liberty, via Raystitch.

The Kindle is from my husband, of course.


(Thank you)
x


Saturday 13 October 2012

A short sewing story

I had a whole afternoon to myself today.

So naturally I decided to sew.

I felt brave, so I tried something new: a log cabin block, from this inspiring tutorial.


And another one:


Why are they a bit rectangular? 
Well - I had a plan. I was going to make a Kindle case, and modelled my blocks on the dimensions of the Kindle.

So far, so good.

But then it all got a bit complicated. My batting wasn't quite thick enough to defend the Kindle against knocks and drops, and I very much wanted to end the day with a completed project.

(Ok - I was impatient).

I used this tutorial to quilt each block separately, and decided to trim them both a bit and make a toddler-sized tote bag.

But then the overlocker got involved and began to misbehave.

My blocks were being trimmed into oblivion, and it was no longer fun. At all.

And then at last the solution came to me...

Wasn't I just saying I needed a pincushion?
And what better way to keep my favourite fabrics always on display?


Woohoo, fun again!

And finished in time for the school run.


Wednesday 10 October 2012

KCWC, and Oliver+S meets the Doctor


It's already day 3 and I'm late to the party, but have been sewing away for the past few days, trying to conquer knits (or maybe my fear of knits - is there a word for that?) with the help of the O+S Hopscotch pattern.


I've just finished an Oliver+S jumprope dress, and thought I could predict its associations - surely it would be steeped in Charlie and Lola, as my sewing friend Lotta pointed out last week.


But no. I stitched it last week, immediately after watching the finale of this season's Dr Who, and it turns out to be a Who dress which makes me want to sob.


Luckily, this happy little music box dress makes me smile again...


And as for those Hopscotches, I'll be back with photos soon.

Sunday 30 September 2012

A (sort of) public service announcement

A few months ago my husband read a newspaper article about a professional seamstress who had inhaled a pin and who then went on to have major surgery with life-long consequences in order to remove it. After that he started to look a bit jittery whenever I put pins in my mouth (which was often).

A few weeks later, feeling slightly hen-pecked, I went back and read the article myself... and haven't put a pin near my mouth since. The instinct to do so it still there, so I have to consciously stop myself every time. And every time it happens I think: 'must put this on my blog'.  Then I think: 'this is why proper grown-up sewists use pin-cushions'.

I've never had a pin-cushion of my own, though I did once make one at school as a gift for my mother. Perhaps my subconscious has been waiting for one of my children to do the same for me, but, on reflection, I realise they probably don't do that in schools any more.

So, off to make one of my own. Maybe it will be like coming of age as a seamstress.

I'll be back with some actual sewing soon.


Wednesday 12 September 2012

Lost in translation


My two Japanese sewing books - Les Couleurs Francais and Girls' Style Handbook - have been wonderfully soothing bedtime reading for a long time, without generating any actual sewing (apart from the abortive knit fabric moment a few months back) but at last their time has come. I took the books - along with plenty of tracing paper and some of my favourite hoarded fabric - on holiday this year, and came home ready to sew.

I don't speak Japanese, but the diagrams are so clear that that really wasn't an issue. Adding the seam allowances was fine as well: familiar from using European patterns, and no problem as long as I kept concentrating (lapses in concentration lead to all sorts of angst, like ectopic seam allowances added to fold lines). The sizing was unfamiliar, but as my daughter isn't quite big enough for either book I just traced the smallest option, and will wait for her to grow if needs be, so no problems there.

No, the challenge for me was quite different, and to do with a whole, subtly different, style of sewing in the books: edges bound with (lots and lots of) bias tape, extending to form ties and fastenings; facings rather than linings; triangular inserts around sleeves and necklines, which I'll have to try sometime soon.

I only realised it was an issue when my first top was almost finished - this is pattern L, by the way, from Girls' Style Book ISBN 978-4-579-11181-7. I had swapped the bound neck edges for a yoke lining, and consequently had to add a button-loop and button instead of ties at the back of the neck.


And I used a technique from the Oliver + S Ice-cream dress, where the front and back pieces are attached to the lining pieces of the yoke, then the yoke front and back are edge-stitched for a neat finish.


Even the final photograph has been inadvertently translated back into my comfort zone: I tried to do a Japanese-style picture against a plain wall, but my camera couldn't cope with the busy Liberty floral against the white, and I had to revert to my fail-safe photo spot on the garden table.


I'm delighted with outcome, even after a bit of adaptation! Now to iron a furlong or two of bias tape for a more authentic take on the pattern next time...

Monday 13 August 2012

Saving the best for last (Ikea #4)


This floral print was the original and best IKEA fabric - for me - which I bought a couple of years ago with no particular plan in mind.


As so often, after a long wait a plan evolved: my old handbag was battered beyond redemption...


... so I chopped it up (saving those jingley metal bits for another day)...


... and appliqued the handbag lining, with its handy little pocket, onto the lining of a new tote bag.


(Not perfect, but no-one outside this blog will ever see that.)


Then I stitched it all up. It would have been quicker if I'd remembered to attach the straps first time, but even with a bit of seam-ripping it was a swift project.


And there's the inside pocket - so useful, and almost effortless.

Next time, if I don't have another handbag to sacrifice, I'll be using this new tutorial from LiEr at Ikat Bag. How did she know exactly what I was needing?


Saturday 11 August 2012

P-p-p-pick up a Pendrell (or, the IKEA dream #3)

 Last summer was the season of the Sorbetto. This year I've invested a bit more by actually paying for a pattern - the lovely Pendrell from Sewaholic.

Pendrell front

It shares many of the Sorbetto's virtues: it's quick and simple to sew, and (for the simplest sleeveless version here) it can just be squeezed out of a metre of fabric***. The single metre didn't allow for any fussy-cutting, though, so the contrasting panels were purely down to happy accident.


Pendrell back

I knew the sewing gods were smiling on my Pendrell when the bobbin thread ran out -
at the very end of the final seam.

And when the shoulder seams came together like a pleasing patchwork.


The fabric, of course, came from IKEA.

 (Did you spot its fleeting moment of glory the Olympic opening ceremony?)

But, back to the pattern...

I loved it - quick and easy, and just fitted enough to feel that it's more-than-just-a-T-shirt. The best bit, for me, was the method for attaching the bias tape. It's sewn with both raw edges of the bias tape aligned with the edge of the fabric - just like the neckband of a T-shirt, in fact - but then folded back to form a facing. It makes for an elegant and easy finish that's juts a touch simpler than standard bias tape, and I'm all for simplicity in sewing.

In fact it's so good I had to make a second one straight away - this is the more sedate (and stash-busting) version in a Valori Wells linen. The only change is a slightly lower neckline. 


I'd have added the ruffley sleeves if only I'd had more fabric - maybe for the next-but-one - the next is already cut out in a Liberty-esque cotton lawn.


***I should add a warning about trying to eke it out of a metre: it's not what the pattern envelope recommends, and it led to some ugly cutting within the seam allowances (pictured below - peek, then look away quickly!).

seam allowance shame...


Wednesday 1 August 2012

Living the IKEA dream #2 (or not)


Oh, the best laid plans...

I had very specific intentions for this floral cotton from IKEA, and they did not involve upholstery at all (I was thinking of the Lisette Diplomat dress) but my smallest one had other intentions . She had managed to wear holes through both sides of her car seat, which turns out to be such an old model that it's no longer possible to buy new covers.


A small and masochistic part of me quite enjoyed the repair process (and the satisfying discovery that those grey side panels had originally been navy blue). I'm almost tempted to embark on a complete overhaul, inspired by this amazing pattern from expatria, but will probably opt for waiting for smallest one to grow into the next seat up, which for some reason is much less shabby.


Anyway, I shall be back soon with pictures of Pendrells, but as I've wandered so far off-topic here's a strangely uplifting link to the discovery of the world's earliest known bra. I can't construct a convincing narrative linking it to the car seat cover, but some things are just so good that they should be shared.


Wednesday 18 July 2012

Living the IKEA dream #1

I love IKEA fabric, but seldom buy any.

This is why...

We set out for IKEA all excitable, armed with lists and plans and dreams of meatballs and apple cake. Even the inevitable queue for the car-park doesn't dent our anticipation. We arrive at the top-floor entrance in a state of whole-family mild hysteria.

The top floor lives up to all our expectations: little pencils(!); paper measuring tapes(!): miniature flats with magic storage solutions(!); (once, one of us was so carried away by the fake bathroom that they tried to use the faux-toilet - but luckily another one of us intervened just in time). There is no real shopping on the top floor, just looking and coo-ing. And then we get to the cafe with its wonderful play-places and re-fillable coffee mugs - we are living the dream.

Next floor down, I'm still in the zone, but the others are not quite so perky any more. There is real shopping to be done, the list doesn't quite match the items on display, the trolley isn't quite big enough and has to be swopped for a larger model, the children have eaten and so cannot be bribed to help with trolley swopping manoeuvres. IKEA fatigue is setting in. When we reach the children's department there's a moment of re-invigoration, but as we leave it behind the day is over - time to go home.

This is when we pass the fabric - I look (longingly) but we press on grimly down the ground floor (momentary excitement again when we go on the magic ramp that locks the trolley wheels). 

On the way out, we reach the food store, and suddenly everyone is happy again, but the fabric department is a distant memory.

Of course there's a simple solution: gainful employment somewhere far away for all the rest of the family, while I potter round on my own. Fabric heaven.


Fussy-cut scatter cushions from birdie fabric...


and a fussy-cut chair cover as well.


And not  flat-pack in sight.


Saturday 30 June 2012

Answers and apologies...


I've just been reminded that I never came back with the answers to the Jubilee Quiz (courtesy of son#1) - so sorry - here they are at last:


How many Prime Ministers have served under Queen Elizabeth 2? 12
Which of the queen’s children have taken part in the Olympics? Princess Ann
Name one of the Queen’s Corgi’s? (Any of the options here are correct) Linnet,Monty,Willow & Holly  

What was the average UK house price in 1952? £1,750-£2,25

What year did Queen Elizibeth have her ANNUS HORRIBILUS?    1992

How old was Queen Elizibeth when she was coronated? 26              

How many official residences does the Queen have? 2                   

Who was Dr Who’s companion in the episode set during the Queen’s coronation? Rose 

How many Grand-Children does the Queen have? 8

What sort of ship is RMS Queen Elizibeth? Luxury Ocean  
Liner

When was the Queen born? 1926

What year was Queen Victoria’s Diamond Jubilee? 1897  

Who sung “Diamonds are a girls best friend”?Marilyn Monroe

When was the Queen Elizabeth Bridge completed? 1991

When was the Queens most recent great-grandchild born? 31st March 2012

What famous building is opposite the Queen Elizabeth II conference centre in London? Westminster Abbey

What are the royal guards that wear read coats called? Beefeaters!

How many British monarchs have reached 50 years on the throne? 5

Which naval ship officially started the diamond jubilee celebrations? HMS Diamond

Name one of Neil Diamond’s No1 hits "Cracklin Rosie", "Song Sung Blue", "Desiree", "You Don't Bring Me Flowers", "Love on the Rocks", "America", "Yesterday's Songs", and "Heartlight"


On the day of the street party, we had teams of up to four people, and the winning team (led by a history teacher) scored 13/20.

And a special mention for Lotta, who left so many good answers in the comments section here!


Wednesday 27 June 2012

Instant PJs - just add bed-time

For all my talk of slow and mindful stitching, there are time when just want to start a project this evening and finish it yesterday - especially when I'm making a trial-run, more-or-less-a-muslin for a long-planned project. I've been planning to make some nice summery pyjamas for a long time, and had even bought some decadent Liberty silk, but wasn't quite brave enough to cut into it without a bit of experimentation first.


Meanwhile, my pile of Burda-style magazines was becoming a secret source of guilt - I must have collected at least twenty of them without ever using any of the patterns. It was something to do with the tracing, plus adding seam allowances, that meant I fell at the first hurdle every time. So, I took drastic action, and cut out a pattern for a pair of shorts directly from the pattern paper...


Outrageous extravagance, or pragmatic solution? 
(given that I'd probably never have made the other thirty patterns from that issue anyway).

Anyway - they came together in a twinkling. With a double row of waist-band elastic copied from the Colette Madeline bloomers.


Then I added a matching Sorbetto top from last summer...


Instant PJs! All sewn up and ready in time for bed.

Shall I risk cutting into the silk now?

Sunday 17 June 2012

Lego love...

This is what I'll be getting my husband for his birthday.

We celebrated Fathers' Day by going to the Lego shop in Brighton - it's not big, but immediately identifiable by the crowd of pre-teen boys outside pressing their noses against the window and ooh-ing over the star wars mega-ships. Oh - and by the crowd of thirty-something dads clustered around the camper-van.

I must admit, I'm quite taken with it myself.

Apologies to those who come here for respite from all of that. I'll be sewing again soon...


Sunday 3 June 2012

Jubilee Jamboree


It's the Queen's Diamond Jubilee today, and we've been celebrating in very traditional style with a street party, complete with bunting, a bouncy castle, and a sit-down meal at trestle tables set up down the middle of the road. Oh - and a theme - 'Pirates and Princesses".


I did some craft activities with the children: a bit of flag making (and waving)...


... and some swashbuckling pirate crafts.


Look at me channelling Damian Hirst with my diamond encrusted skull&crossbones...


Son#1 wrote the quiz:


How many Prime Ministers have served under Queen Elizabeth 2? 
Which of the queen’s children have taken part in the Olympics? 
Name one of the Queen’s Corgi’s? (Any of the options here are correct) 
What was the average UK house price in 1952?

What year did Queen Elizibeth have her ANNUS HORRIBILUS?  

How old was Queen Elizibeth when she was coronated?  
   
How many official residences does the Queen have?   
            
Who was Dr Who’s companion in the episode set during the Queen’s coronation?

How many Grand-Children does the Queen have? 

What sort of ship is RMS Queen Elizibeth? 

When was the Queen born? 

What year was Queen Victoria’s Diamond Jubilee? 

Who sung “Diamonds are a girl's best friend”?

When was the Queen Elizabeth Bridge completed?

When was the Queens most recent great-grandchild born? 

What famous building is opposite the Queen Elizabeth II conference centre in London?

What are the royal guards that wear read coats called? 

How many British monarchs have reached 50 years on the throne? 

Which naval ship officially started the diamond jubilee celebrations? 

Name one of Neil Diamond’s No1 hits.


Answers to follow!

Monday 30 April 2012

night-night too-whoo

I've toyed with the idea of toy-making for a while, without actually taking the plunge and making anything. But what about my Owl pyjama-case? Well, I'm choosing not to count him as a toy, but as storage solution. Which means that when I see him about the bedroom, he represents tidiness rather than clutter.


Who knew that an orderly life could be achieved so easily?

(If only I could find a similar solutions for every other room in the house.)

Meanwhile, here's what I did to make him...


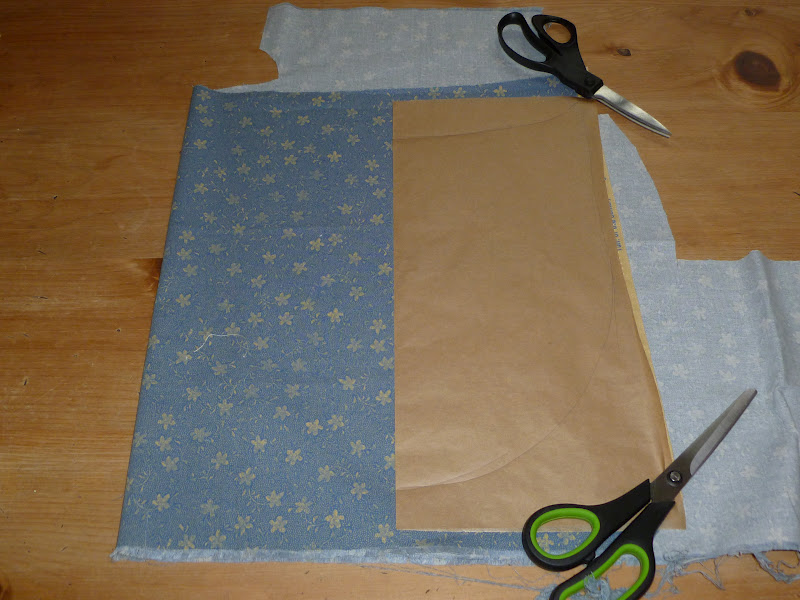
His size was dictated by the size of my fabric. I folded it in half, and cut a piece of paper to match.


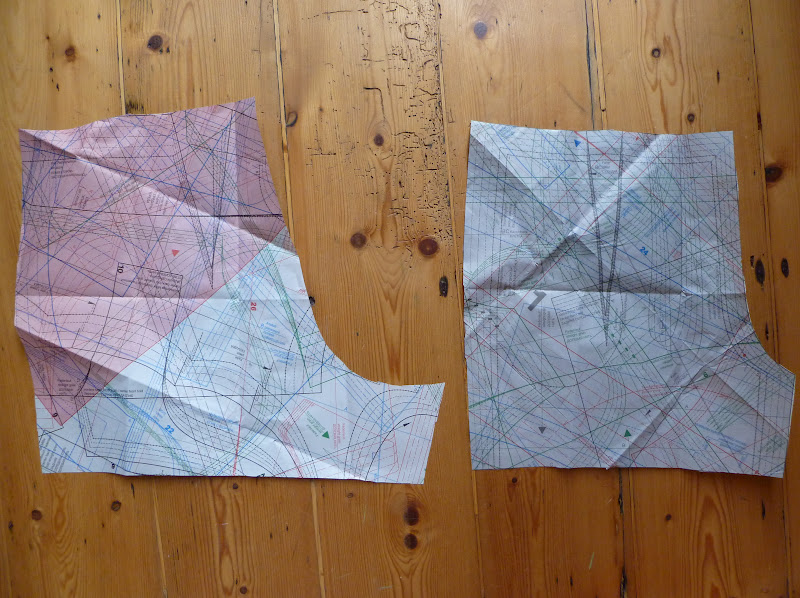
Then I folded the paper lengthways, and drew in one half of the owl pattern. The top of his head was a horizontal line starting at right-angles to the folded edge, curving up slightly at the end for the tufts of his ears. Owl's body was formed with a long 'J' shape from the point of his ears down to meet the fold again at right angles - just visible on the next photo.


I opened out the pattern to give my owl template, and cut out one front piece from the main fabric, and one from the fleece lining fabric.


Then I cut two back pieces from the main fabric and two from the fleece, using the template folded in half lengthways (as it was originally drawn).


The pieces so far:


Next Owl needed some features. First of all, a tummy piece which doubled as a pouch (surely that should come in useful sometime***?). I folded the pattern piece top-to-bottom, leaving a crease across the middle....


... and used that crease a a template to cut the tummy piece, placing the folded line of the pattern on the folded edge of the fabric, so the only raw edges were on the outside curve.


Now Owl needed some wings. I drew a wing, as above, and cut it out with added seam allowances to the inner edges - the outer edge already had a seam allowance included. Then top of the wing needs to be above the line of the tummy / pocket, so that it can be sewn down later on.


I used my wing template to cut two wing pieces in three different fabrics: front, back and a fleece middle layer to give the wings some plumpness.


Next, Owl needed some big round eyes. I used a glass to draw my circle, and then backed it with Bondaweb ready to applique onto Owl's face later on.


On to Owl's feet. I drew a three-toed foot using the outer edge of the body template as a guide...


... and then cut the foot template out with a 1cm seam allowance added on all around, and used it to cut a front and back piece for each foot.


The pieces so far: pocket/pouch (seen unfolded here);  body - front and back in outer fabric and fleece lining; feet - front and back; wings (each of those pieces is cut as a double layer); and two eyes, both backed with bondaweb.


Have you spotted that Owl has no beak? His original triangular beak (seen here when I was playing with the pattern pieces) didn't work out quite right.


Instead the beak pieces needed to be shaped like a diamond with one point missing - as seen here:


Time to put it all together at last!


First I folded my pocket piece in half with wrong sides together, and edge-stitched across the top.


Then I stitched it in place, and ironed the eyes in place as well.


For Owl's feet, I cut out the actual foot pattern piece (leaving only the seam allowance where it would attach to the body)...


... and used it as a template to sew together my foot pieces, right sides together, leaving the top edge open.


Then I trimmed the seam allowances, turned the feet right-side-out...


... and added a little bit of polyester stuffing to make them squidgy.


I pinned and stitched them in place on Owl's bottom edge.


I pinned the wing pieces together, with the right sides of the patterned fabrics facing each other, and stitched around the curved edges, leaving the straight top edges open.


Then I trimmed the seam allowances, and turned them right-side out.


I edge-stitched the wings in position, leaving room for seam allowances on the front body piece.


Then I stitched the two beak pieces together, leaving the top open...


... folded the open top seam inside, and added just a whisper of stuffing...


... before stitching Owl's beak onto his face across its top (open) edge.


I spent a long, long time choosing buttons for Owl's eyes, and then added a running stitch around the bondaweb/applique pieces.

Hooray: front piece done!

(I had an interlude for tea and biscuits to celebrate.)

Now for the back. I thought that Owl might see some rough handling in his life, so I reinforced the zip at the top and bottom with scraps of the floral fabric from his pouch. I simply folded these and placed them over the ends of the zip, with the folded edge inwards.


Then I sandwiched the zip between one of the back pieces and one of the back lining pieces, right sides together, stitched and pressed, and did the same for the other side.


Back piece done!


I put the decorated front piece on top of the back, with their right sides facing each other, and
then placed the front lining piece on top...


... pinned all the way around the edge, being very careful not to catch the wings...


...and stitched it all together.


Turned and pressed: ta-dah!


Here's Owl in action - filled with pyjamas and looking plump and cuddly. He's been used every day since he was made, has survived the washing machine, and has been out for a bath-time playdate with toothbrush and toothpaste in his pouch (see *** above).


Son #1 likes him, and has requested a bear. How shall I do that?